Bucket Seat Upholstery Replacement
Tools Needed:
1)
Hog Ring Pliers
(good ones, with a rubberized grip. Your hands will thank you!)
2)
Heavy duty
Diagonal Cutters.
3)
Razor Blades
4)
Pliers
5)
Heavy Duty
scissors
Supplies:
1)
1lb. Hog Rings
(approx. 1”x3/8” before compressing)
2)
Listing Wire (or
heavy coat hangers, welding rod, etc.)
3)
1”x2” light gauge
“No-Sag” spring material and upholstery clamps (only if your frames have any
broken springs)
4)
Heavy Twine.
5)
Jute padding
6)
Burlap
7)
Good quality seat
covers made for the frames you’re covering.
8)
Seat Foam.
Preferably from your old seats if available and usable. If not, order the
correct ones from an aftermarket supplier, such as Year One, Classic
Industries, etc.
9)
3M “77” Spray
Adhesive
Disclaimer: I am no
expert! I’m not an upholsterer. I’m documenting the process I used to recover
my seats. Experts may use other tools or methods and I would defer to their
expertise, when possible. This is not an easy process, but if you’re used to
tackling projects and are willing to learn, you should be able to complete your
seats and be proud to say, “I did the upholstery myself!”, when you’re done. In
the process you’ll save yourself three to four hundred bucks versus having an
upholstery shop do them.
Have Fun! (I did!)
Part 1, The Seat Bases
The seats I’m working on are
from a 1965 Chevelle. The process for Nova seats is
identical. Also, there is no reason (in my opinion) that these techniques would
not work with a bench seat. If you’re removing the old upholstery, pay attention
to what you’re removing and where it came from. This will help in the
re-assembly. Also, remove and set aside ALL of the wire (listing) from your old
covers. If you do not have covers, therefore no wire,
you can buy it from an upholstery supply store. You can also use old coat
hanger, but use the thickest coat hanger wire you can find.
1) After making sure the seat frames are solid, rust
free, and preferably primed/painted, use twine to tie the springs so that they
move as a unit as they are compressed. If individual springs need to be
replaced due to breakage, buy “1”x2” no-sag” spring from an upholstery supply
house. This can be bent to the exact shape of the spring being removed. If too
many springs are broken, it is probably best to buy a complete spring set for your
application.
This frame/springbed was
completely cleaned and derusted with naval jelly, wire brushes, elbow
grease and lots of patience. It was then primed with DP90 and tied with
upholstery twine.
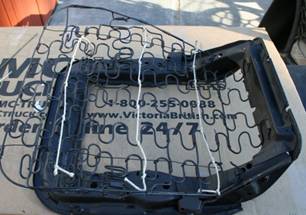 Photo 1
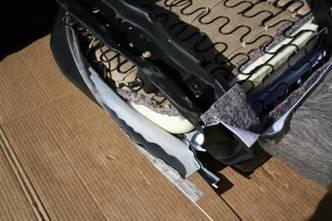
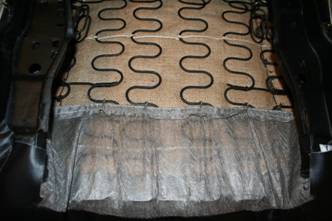
2) After priming and tying, burlap is used to cover the springbed. Use 3M spray adhesive to attach the jute to the
burlap. Allow the adhesive to dry for five minutes, before attaching the two
materials. Hog rings can be used to attach the fabrics to
the springs on the perimeter, but care must be taken to cover them in later
steps so they don’t damage the finished upholstery. Jute should also be
attached (glued) to the rear of the frame. This will pad and protect the upholstery
once it is pulled tight over the back, see photo 2.
3M Spray Adhesive was
used to attach the Jute to the burlap and to the rear of the frame
(backside). Note: Openings were cut
into the Jute padding. These openings are positioned directly over the
listing wire which is attached to the spring bed, beneath the burlap (See
Photo #3)
![]()
![]()
![]()

Photo 2
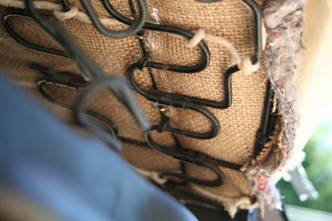
Listing wire is used to
attach the upholstery to the springbed. It is aligned with the pleats of
the finished upholstery. The listing wire should be hog-ringed to the
springbed in several places, as there will be considerable pull against the
wire when the seat cover is secured into place.![]()

Photo 3
3) Before installing the upholstery to the seat
frame/springbed, the foam must be modified by cutting the slots completely
through. (Photo 4 and 5) Use a new razor blade to do this, keep spares on hand!
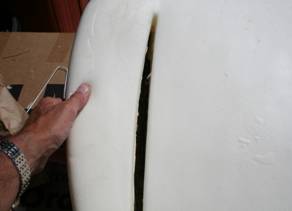
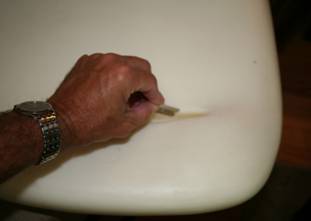
Photo 4 Photo 5
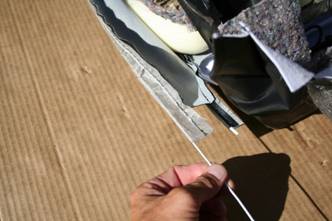
4) Slide a piece of listing wire into the cloth loop
provided under the rear of the seat cover (photo 6). This will be secured to
the springs from underneath (photo 7) and will hold the upholstery in place
while you set the foam, to begin.
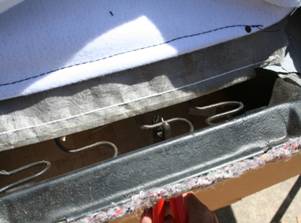
Photo 7 Photo 6

5) Install the foam on the springs, under the seat
upholstery. Make sure to center the foam on the springs, with the slots
positioned over the listing wire. Photo 8
Photo 8
Photo 8 Insert listing wire, cut
to the correct lengths, into the loops (2 places), provided. These will be
secured to the listing wire already attached to the springs on the seat
base.
![]()
6) Starting as far to the rear of the seat as possible,
begin hog-ringing the listing wire in the loops, through the slots into the
foam and secure the hog rings to the listing wire on the springbed (photos 9
and 10). Place two hog rings approx. 2 inches apart on one side (pleat), then
position two more in similar positions on the other side (pleat). Alternate
placing two at a time until you’ve worked your way to the front of each pleat
(approx. 8 hog rings per side). This is NOT easy!
NOTE: Be careful not to poke through the finished upholstery
with the hog rings, as they are VERY sharp.
Photo 9
Hog rings from the top
secured to the listing wire under the foam. Photo 10

![]()
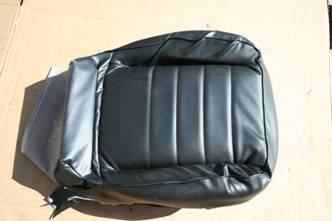
This seat is nearing
completion. All hog rings are in place and the pleats are secure. Photo 11
7) On a clean surface, turn the seat base upside down and
insert listing wire into the loop around the bottom edge. Photo 12
Photo 12
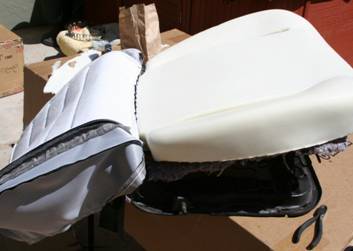
8) After inserting the listing wire, make sure the foam
is extending beyond the spring frame around the entire perimeter. The
upholstery will be stretched around the foam, in order to secure it. Photo13
Photo 13 Note: Foam around edges, covering the jute and burlap
and protecting the finished upholstery from wearing against the spring
frame.

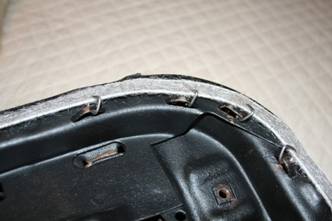
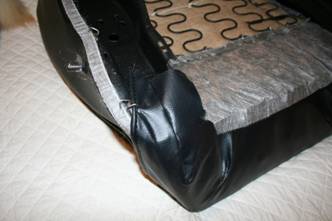
9) You are now ready to attach the upholstery to the
frame. It is best to have someone help you when performing this step, but I was
able to stand on the frame in order to compress the springs sufficiently. Carefully
stretch the upholstery around the base. Align any pleats or patterns so that
they are symmetrical on the frame. Starting at the corners, hog ring the edge
of the upholstery around the listing wire to the loops in the frame base. Hog
ring in at least two places on the corner and then shift to the next
corner before allowing the springs to relax. Put at least two hog rings in that
corner. Photo 14
Photo 14 Hog rings through loops on frame corner and through
cloth loop around listing wire

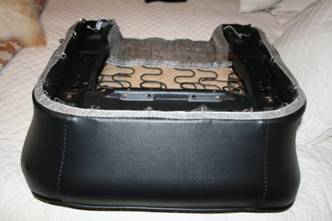
10) Proceed from
the corners to the rear of the seat, leaving the last loop
on each side unfastened.
Now, hog ring the front edge of the
upholstery to the
front edge of the frame, using all the loops provided.
(photo 15)
Additional hog rings installed toward rear of seat base
and around front edge between corners.
Photo 15

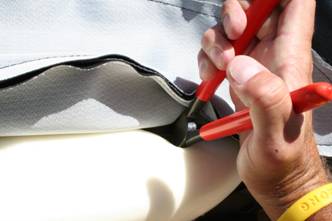
11) ![]() After securing
all but the rear most hog rings on the side, the seat back pivot studs will be
pushing hard against the upholstery and will need to be exposed. To do this,
use a sharp razor blade to cut a small “X” in the vinyl directly over the
center of the stud. This will allow the stud to protrude. This may need to be
trimmed later. Photo 16
After securing
all but the rear most hog rings on the side, the seat back pivot studs will be
pushing hard against the upholstery and will need to be exposed. To do this,
use a sharp razor blade to cut a small “X” in the vinyl directly over the
center of the stud. This will allow the stud to protrude. This may need to be
trimmed later. Photo 16
Cut a small “X” directly over the center of the
seat-back pivot stud. Trimming may be necessary, here.![]()

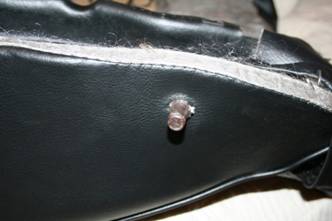 Photo 16
12) Place listing
wire (cut to length) through the loop in the cloth flap under the rear of the
seat and secure it with hog rings in four places, to the springs. Pull this as
tight as you can. Photo 17
Secure cloth flap to springs in four places, here
Photo 17


13) At the rear of
the seat base, there should be two flaps of upholstery
that still need
to be secured. Pull the down tight under the seat base and
pull them forward
as far as possible. Secure them around the seam and
bead to the rear
most loop on the frame. Photo 18
Photo 18 Pull this “flap” tight and hog ring it to the rear loop
on the seat base bottom frame.


14) Voila! A completed seat base. If you’re concerned
about wrinkle, or
un-evenness in
the foam under the upholstery, leave the seats in the
direct sun for
awhile to warm them. They can then be “massaged” and
manipulated with
your hands to smooth them.
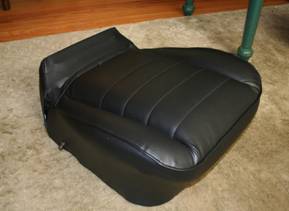
With
new seat foam, the finished seats will appear “puffy” and over-stuffed. This
tends to settle down a bit after installation and use. You may be able to trim
the foam prior to installation, but I haven’t been brave enough to try.
Stay
tuned for Part 2 (The Seat Backs). Upon completion, the total for the
complete bucket seat upholstery was as follows:
Seat
frames: $150.00 (used, from a local source. I have paid more for the
correct Nova seats on E-bay!)
Foam:
$129.00 (from Original Parts Depot)
Upholstery:
$169.00 (PUI, from The
Paddock)
Misc.
supplies (hog-rings, glue, burlap,
jute, spring stock, etc. from a local upholstery supply store): $25.00
Total:
$474.00 (Not including shipping, your experience may differ, but look around!)
Please
note: There are several GM seats that appear to be the same, but are different!
These differences are subtle. Be very careful when buying “correct” Nova seats,
as many look the same to the untrained eye, but will NOT work due to their
differences. Please do your research to make sure you know EXACTLY what you’re
buying. (that’s how I ended up with seats for a Chevelle!)
Again,
more to come! Good Luck and Enjoy!